> ## Documentation Index
> Fetch the complete documentation index at: https://docs.magicfox.co/llms.txt
> Use this file to discover all available pages before exploring further.
# Virtual Patch Change Script
The [Virtual Patch Change script](https://magicfox.co/pages/mainstage-scripts) allows you to trigger a patch change by playing any note on your keyboard. Because the script works on a separate, alias-able channel strip, each patch can have a different trigger note. Unlike assigning a foot switch to a note on the keyboard, the script still allows the trigger note to play. [Click here for instructions](/articles/scripter/scripter-main) on how to install this script.
If MainStage is not properly configured, your computer can very easily end up in an infinite loop of MIDI messages, and MainStage and/or your computer will freeze. Be very careful to set these settings correctly, and **save your concert** before starting.
## Configuration
1. Open your computer’s **Audio MIDI Setup** app (found in Applications/Utilities, or by clicking the “Setup” button in the MIDI tab of MainStage’s preferences window). (If the **MIDI Studio** window doesn’t immediately appear, choose **Show MIDI Studio** in the Audio MIDI Setup’s Window menu.)
Double-click **IAC Driver** to open the IAC Driver Properties window.
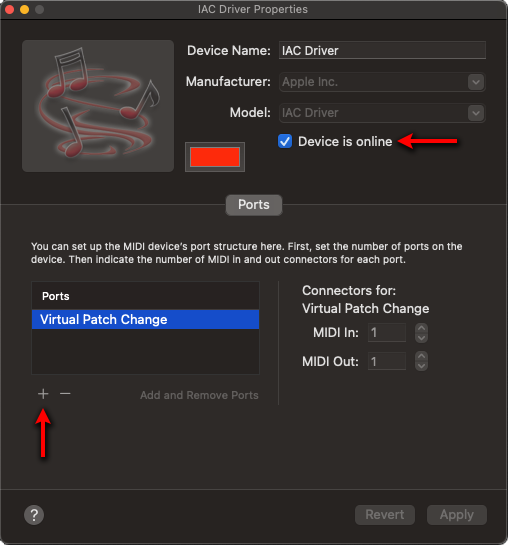 Make sure **Device is online** is enabled. **Add a port** and rename it to “Virtual Patch Change”. Click “Apply” and quit the Audio MIDI Setup app.
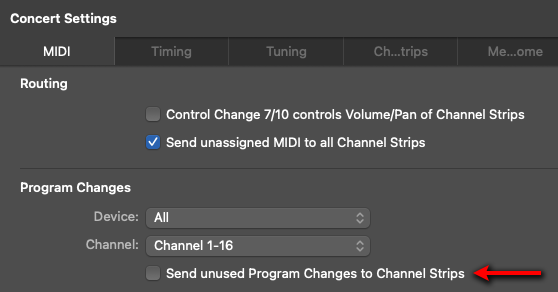
Choose `File > Concert Settings` or click on the concert item in the Patch List to select it. In the **MIDI** tab of the **Concert Settings**, disable the option to send unused program changes to channel strips.
Make sure **Device is online** is enabled. **Add a port** and rename it to “Virtual Patch Change”. Click “Apply” and quit the Audio MIDI Setup app.
Choose `File > Concert Settings` or click on the concert item in the Patch List to select it. In the **MIDI** tab of the **Concert Settings**, disable the option to send unused program changes to channel strips.
 Then, switch to the **Assignments & Mappings** tab.
 Add a new assignment at the concert level. Click the assignment in the list to open the popover and set the following values:
| Setting | Value |
| :------------ | :------------------------------ |
| Device | Virtual Patch Change IAC Driver |
| Channel | Channel 1 |
| Type | Single Value |
| Number | *85 (Ctrl 85)* |
| MIDI Thru | Do not pass through |
| Send Value to | None |
| Name | Virtual Patch Change |
Add a new assignment at the concert level. Click the assignment in the list to open the popover and set the following values:
| Setting | Value |
| :------------ | :------------------------------ |
| Device | Virtual Patch Change IAC Driver |
| Channel | Channel 1 |
| Type | Single Value |
| Number | *85 (Ctrl 85)* |
| MIDI Thru | Do not pass through |
| Send Value to | None |
| Name | Virtual Patch Change |
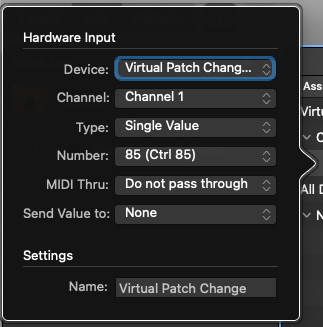 Of the 128 [MIDI control change numbers](https://midi.org/midi-1-0-control-change-messages), most are associated with specific functions (for example, 64 is used for the sustain pedal). A handful of numbers, such as 85, are left undefined for exactly this sort of purpose. You can set this to another number as long as it matches the number specified in the Scripter window.
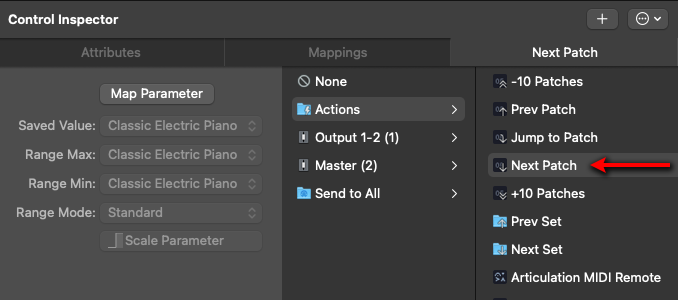
With the new assignment selected, change the mapping from None to **Actions > Next Patch**.
Of the 128 [MIDI control change numbers](https://midi.org/midi-1-0-control-change-messages), most are associated with specific functions (for example, 64 is used for the sustain pedal). A handful of numbers, such as 85, are left undefined for exactly this sort of purpose. You can set this to another number as long as it matches the number specified in the Scripter window.
With the new assignment selected, change the mapping from None to **Actions > Next Patch**.
 Select the patch where you want to use the script. Add an **external instrument channel strip** and name it "VPC".
Set the **MIDI Output** of the VPC channel strip to **None**. (We'll change this again in **Step 11**. Setting it temporarily to None helps to avoid accidental infinite MIDI loops.)
Set the channel strip's audio output to "No Output".
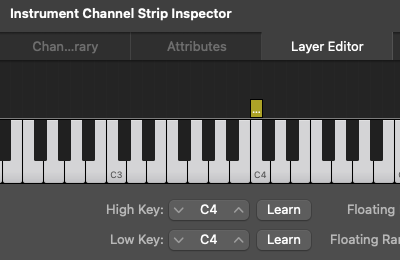
Using the **Layer Editor**, set the range of note(s) that you want to use to trigger the patch change.
Select the patch where you want to use the script. Add an **external instrument channel strip** and name it "VPC".
Set the **MIDI Output** of the VPC channel strip to **None**. (We'll change this again in **Step 11**. Setting it temporarily to None helps to avoid accidental infinite MIDI loops.)
Set the channel strip's audio output to "No Output".
Using the **Layer Editor**, set the range of note(s) that you want to use to trigger the patch change.
 Click the **MIDI FX** button on the channel strip and choose the **Scripter** plug-in. The Scripter window will open. Click the drop-down menu ("Factory Default") and select "MFT Virtual Patch Change NC".
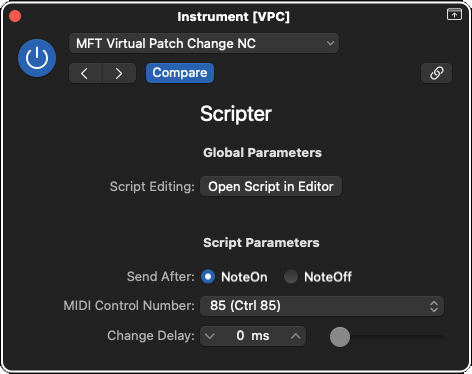 The MIDI control number must match the number you set in **Step 5**.
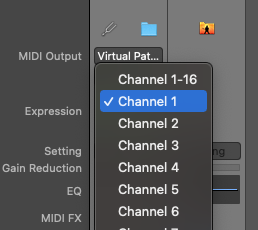
Change the **MIDI Output** of the VPC channel from None to **Virtual Patch Change IAC Driver** and set the **Channel** to 1.
The MIDI control number must match the number you set in **Step 5**.
Change the **MIDI Output** of the VPC channel from None to **Virtual Patch Change IAC Driver** and set the **Channel** to 1.
 Congratulations! If you followed all of the steps above, MainStage should advance patches when you play a key within the range you set in **Step 9**.
To additionally prevent infinite MIDI loops, make sure to assign all other screen controls (e.g., keyboards, pedals, foot switches, buttons, etc.) to a specific MIDI device.
You can alias this channel strip and use it in different patches and with a different note range.
## Parameters
`Send After` Specifies whether the patch change should happen after the note is pressed or released.
`MIDI Control Number` The [control change number](https://midi.org/midi-1-0-control-change-messages) that should be sent when the script is activated.
`Change Delay` The delay in milliseconds before the control change is sent.
Congratulations! If you followed all of the steps above, MainStage should advance patches when you play a key within the range you set in **Step 9**.
To additionally prevent infinite MIDI loops, make sure to assign all other screen controls (e.g., keyboards, pedals, foot switches, buttons, etc.) to a specific MIDI device.
You can alias this channel strip and use it in different patches and with a different note range.
## Parameters
`Send After` Specifies whether the patch change should happen after the note is pressed or released.
`MIDI Control Number` The [control change number](https://midi.org/midi-1-0-control-change-messages) that should be sent when the script is activated.
`Change Delay` The delay in milliseconds before the control change is sent.